TiVo Downloads and Getting Rid of Unwanted Phone Calls
March 2018
DVRs
-
DVRs (Digital Video Recorders) are becoming more common.
-
They displaced the older VCR (Video Cassette Recorder) technology and have some advantages:
-
Usually easier to set up recordings.
-
Digital format rather than analog.
-
No tapes to store/damage/lose!
-
-
Basically, they are a computer with a large hard drive (though you can expect solid state drives to start appearing in place of hard drives, soon).
-
A video signal passes from your provider (e.g., AT&T or SuddenLink), through the DVR (where it may be recorded, under your control), and out to your TV.
-
Later, you can play the recorded videos on your TV.
-
-
There are a number of players in the field, such as:
-
TiVo
-
AVerMedia
-
Tablo
-
GooBang Doo
-
-
Generally, DVRs are designed to record OTA (Over-the-Air) programming.
-
Some DVRs let you watch recorded programming directly on your mobile device.
-
Obviously, this is the easiest solution, if it is available to you.
-
Be aware that, in this case, the DVR streams the video to your device over the Internet, rather than downloading the video to your device for later playback.
-
The instructions given today– on how to transfer DVR recordings to your PC or mobile device – will differ from brand-to-brand, and even from model-to-model.
-
-
TiVo is the “big dog” in the DVR industry, and it’s what I have. So guess what we will discuss?
-
Specifically, I am using a Tivo built into a Suddenlink cable box.
-
Moving from DVR to PC
-
Among other programming, I enjoy watching “comic book” shows, such as The Flash and Marvel’s Agents of S.H.I.E.L.D.
-
I download these episodes to my phone, and then I go to the Colvin Center and watch as I ride a stationary bike. (It helps pass the time better.)
-
The first step is to move programs from the TiVo to your computer.
-
To do this, I use a (free) open source program named KMTTG.
-
It runs on both Windows and MacOS computers, but I’ve tried it only on a Windows computer.
-
There are, most likely, other programs that can do this.
-
-
The first time you launch KMTTG, you will be asked to enter the 10-digit Media Access Key (MAK) from your TiVo, which is needed to download and decrypt programs. To get this key:
-
Access the main TiVo Central menu.
-
Find Messages & Settings.
-
Open Account & System Information.
-
Look for the MAK in the Media Access Key section.
-
-
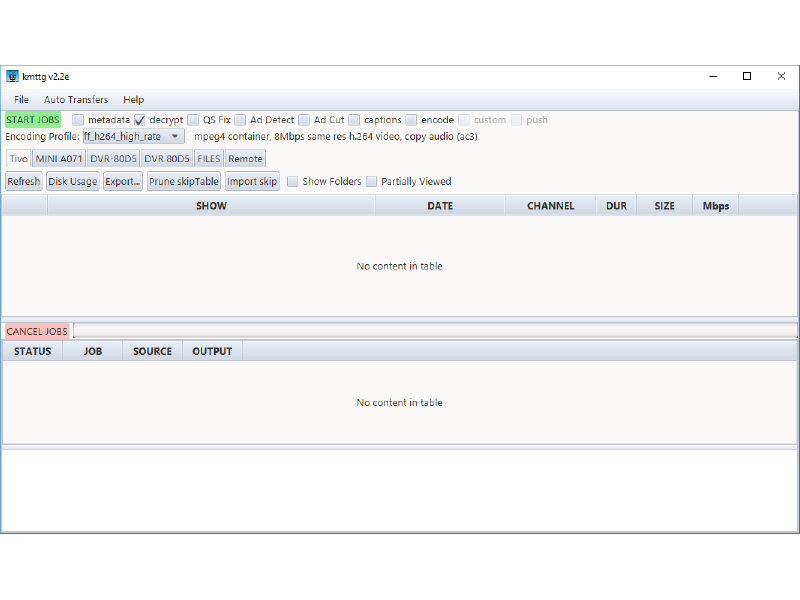
Once you have it set up, KMTTG is going to look something like the following.
-
You may have to change some other configuration settings in the program, and such things are discussed in the KMTTG Wiki.
-
One of the configuration changes is that you will need to download and activate TiVoLibre, the utility that decrypts the downloaded TiVo video files. (See this Wiki page.)
-
-
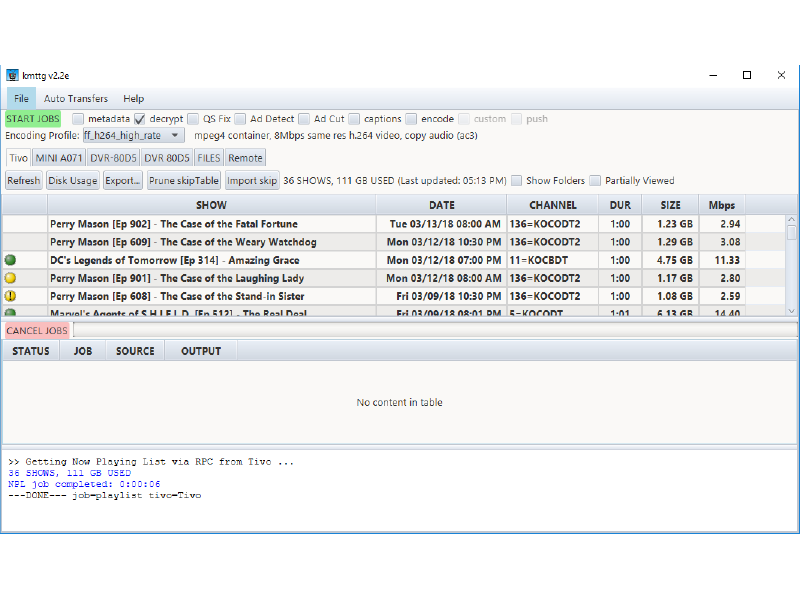
When you click on the Refresh button, KMTTG will fetch a list of all programs on the DVR.
-
This can be done while programs are recording, and while someone is watching recorded or live programs on the DVR.
-
-
Most programming can be downloaded and KMTTG will decrypt it from the TiVo format to a PC/mobile compatible format.
-
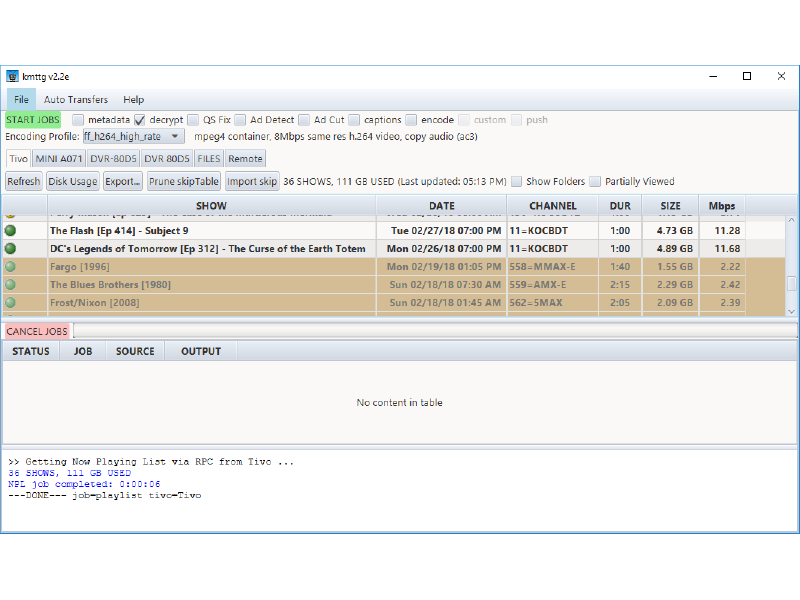
However, some program – such as those recorded from premium services such as HBO, Cinemax, ShowTime, Starz, etc. – cannot be downloaded.
-
These are marked, as shown below.
-
-
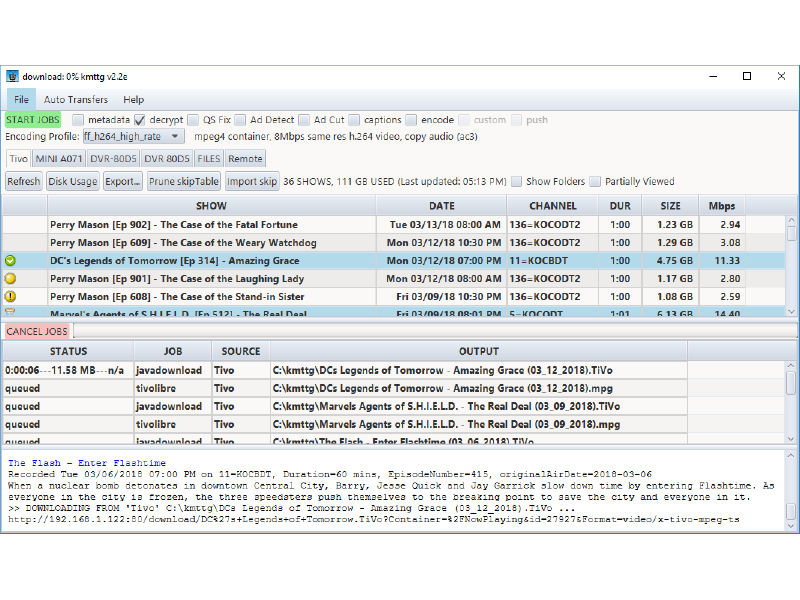
You just select the (copyable) programming you want to download to your computer, and then press the Start Jobs button.
-
Downloading will begin, and the areas below the program list will show the status of the downloads.
-
Notice that each program has two activities: download, and decryption.
-
-
As you may have noticed in the previous KMTTG images, the sizes of the downloaded video files can be quite large. For example, a one-hour program will have file sizes in these ranges:
-
Standard Definition: 1GB-2GB
-
HD 720P: 2GB-3GB
-
HD 1080P: 4GB-6GB
-
Getting to the right video format & file size
-
To reduce the size of a program and (if needed) reformat it for a specific screen size or device, you can run the program through another piece of software that will re-encode it.
-
The program that I use is another (free) open source program, named Handbrake.
-
Handbrake also runs on both Windows and MacOS.
-
-
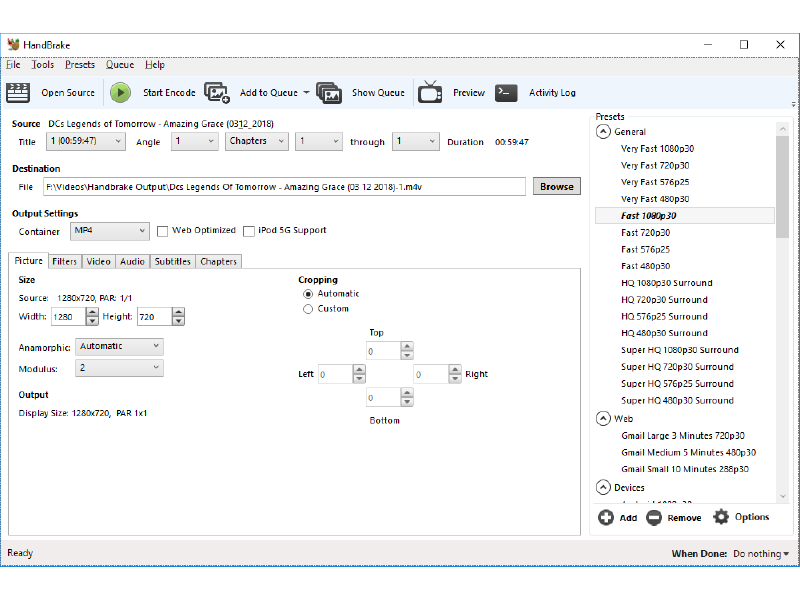
The following shows the Handbrake window.
-
As you can see, down the right side of the Handbrake window there are a few dozen different, predefined formats and resolutions.
-
If you don’t find the one you want, you can create your own, custom format.
-
-
In the previous screenshot, I have loaded the source file, so now I can just click on Start Encode to begin.
-
You also can identify a folder, and Handbrake will encode all of the videos in the folder using the same settings that you choose.
-
-
The program shown on the previous image is an HD 720P video, which is about 5GB in size.
-
I usually choose the “Android” target format (720x406), which is quite adequate for my Galaxy S8, and the re-encoded file is a little over 400MB, or 0.4GB in size!
-
Even if I re-encode the video to its original settings (in this case, 720P or 1280x720), Handbrake reduces the size of the file from about 5GB to about 1GB, with negligible loss in fidelity (in my opinion).
-
How can it do this? I am guessing that Handbrake uses very effective compression algorithms.
Moving the video to an Android device
-
Here is a brief summary of the step you would take to move these video files from your computer to your Android device:
1. Unlock your Android device.
2. Connect it via USB cable to your computer.
3. Open its memory (or its SD card) in your Windows Explorer or MacOS Finder.
4. Drag-n-drop the video files from the PC to an appropriate folder on your device.
Moving videos to your iOS (Apple) device
-
Here is a brief summary of the step you would take to move these video files from your computer to your iOS device:
1. Start iTunes.
2. Unlock your iOS device.
3. Connect it via USB cable to your computer.
4. Click on the little picture of your device near the top of the iTunes window.
5. In the list down the left side of the window, choose Summary.
6. In the area at the right side of the window, under Options, make sure that Manually manage music and video is check marked. If not, check mark it, and then press the Done button at the bottom.
7. In the list down the left side of the window, choose Home Movies (or Movies if you don’t see Home Movies).
8. Drag-n-drop videos from your PC into the area at the right side of the window. You will see a progress bar across the top as the video is copied to your device.
Playing the videos on your device
-
There are many video player apps for your mobile device.
-
The ones I choose to use are
-
Android: VLC (a free, open source app). The default, built-in app is Gallery.
-
iOS: TV (built in, and formerly called Videos)
-
Limiting Unwanted Calls & Emails
-
According to Wikipedia:
A robocall is a phone call that uses a computerized autodialer to deliver a pre-recorded message, as if from a robot.
Robocalls are often associated with political and telemarketing phone campaigns, but can also be used for public-service or emergency announcements.
-
In a Robocall Strike Force Report, the Federal Communications Commission (FCC) states that in recent years telemarketing calls have been their #1 consumer complaint. (Info from an article in the Boston Globe.)
-
Citing statistics from YouMail, a developer of robocall-blocking software, the FCC said consumers received an estimated 2.4 billion robocalls per month in 2016.
-
This is driven in part by internet-powered phone systems that have made it cheap and easy to make them from anywhere in the world.
-
-
You can download and read the Robocall Strike Force report.
-
YouMail also maintains a webpage on which they supply the statistics on robocalls for the most recent month (2.7 billion in February 2018) and a graph for the past year.
-
While there are a number of robocall blocking services, let’s take a look at YouMail. According to their website:
-
YouMail works by looking for the OCN (Originally Called Number). Whenever a carrier forwards a call, they are supposed to attach the OCN (mainly for tracking purposes). The attached OCN allows you to keep your phone number and have a voicemail account that gives you more freedom.
-
There are certain cases where the OCN may be missing. A missing OCN causes callers to hear an, “enter your 10-digit number” prompt, instead of your voicemail greeting.
-
Please note that I am not advocating the use of YouMail; rather, I’m using it as an example of such services.
-
The pricing for YouMail:
-
Free version – $0/month (Features)
-
Plus version – $5/month (Features)
-
Professional version – $10/month (Features)
-
-
-
Other options for limiting unwanted calls and emails can be found on this FTC webpage.
-
My suggestions are:
-
Read and follow the suggestions from the FTC webpage.
-
If this is not sufficient, try the free version of YouMail or another such product.
-
If these still do not meet your needs, look at a paid subscription to YouMail or another such service.
-

